|
Sie sind hier: ZWikiSeiten > ZBCustomZopeObjects Zopebuch: Inhaltsverzeichnis Dieses Dokument ist momentan noch nicht vollst�ndig �bersetzt. �bersetzung von LuciaKapitel 14: Zope erweiternSie k�nnen Zope durch das Erstellen eigener Arten von Objekten erweitern und auf Ihre eigenen Bed�rfnisse anpassen. Neue Arten von Objekten werden in Zope durch Products (Produkte) installiert . Produkte sind Erweiterungen von Zope, die von der Zope-Gemeinde und vielen anderen Drittherstellern entwickelt werden. Es gibt hunderte verschiedene Produkte, viele dienen sehr speziellen Anwendungen. Eine komplette Liste an Produkten findet man unter "Download" bei Zope.org. Produkte k�nnen auf zwei verschiedene Arten entwickelt werden, �ber das Web durch Benutzung von ZClasses (Z-Klassen) und durch die Programmiersprache Python. Produkte k�nnen sogar eine Mischung von beidem, den Web-Produkten und Python Code, sein. Dieses Kapitel besch�ftigt sich mit der Erstellung neuer Produkte �ber das Web, ein Thema das wir schon kurz in Kapitel 11, "Suchen und Katalogisieren von Inhalt" angeschnitten haben. Ein Produkt komplett in Python zu programmieren w�re hier au�erhalb des gesteckten Zieles, f�r spezielle Dokumentation zur Produkt-Entwicklung besuchen Sie deshalb bitte Zope.org. Dieses Kapitel zeigt Ihnen wie Sie :
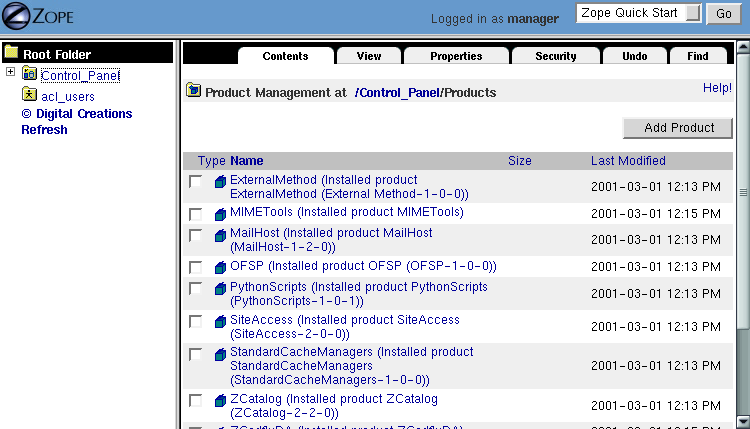
Im n�chsten Abschnitt werden wir erste Schritte im Anpassen von Zope an Ihre Bed�rfnisse machen. Dort lernen Sie, wie neue Zope-Produkte erzeugt werden. Zope Produkte erstellenProdukte werden bei ZOPE im Product Management folder (Produkt Management-Ordner) im "Control Panel" (Systemsteuerung) gespeichert. Klicken Sie auf das Control_Panel im Stammordner und klicken Sie dann Products. Sie sind nun auf dem Bildschirm, der unter Abbildung 12-1 gezeigt wird. Abbildung 12-1 Installierte Produkte ??? Installed Products Jedes blaue P�ckchen zeigt ein installiertes Produkt an. Von diesem Bildschirm aus k�nnen Sie diese Produkte verwalten. Einige Produkte sind standardm��ig in Zope eingebunden oder wurden von Ihnen oder Ihrem Administrator installiert. Diese Produkte haben ein Symbol, das ein geschlossenes P�ckchen anzeigt. Siehe hierzu Abbildung 12-1. Produkte mit einem geschlossenen P�ckchen k�nnen nicht �ber das Web-Interface bearbeitet werden. Sie k�nnen durch klicken auf diese Produkte Informationen erhalten, sie aber nicht ver�ndern. Sie k�nnen au�erdem Ihre eigegen Produkte erzeugen, die sie dann auch �ber das Web ver�ndern k�nnen. Produkte lassen Sie neue Arten von Objekten in Zope erzeugen. Diese durch das Web verwaltbaren Produkte haben Symbole, die ein offenes P�ckchen anzeigen. Wenn Sie den Beispielen in Kapitel 11 "Inhalt durchsuchen ud kathegorisieren" gefolgt sind, dann haben Sie nun ein News/Neuigkeiten Produkt mit offenem P�ckchen. Wieso wollen wir eigentlich Produkte erzeugen? Nehmen wir an, alle Betreuer des Zoos wollen einen unkomplizierten Weg, um einfache Online-Ausstellungen �ber den Zoo zu erzeugen. Die Ausstellungen m�ssen alle dasselbe Format haben und eine gleiche Informations-Struktur haben. Au�erdem soll jede Ausstellung einem speziellen Tier zugeordnet sein. Um dieses zu erreichen, k�nnten Sie eine Ausstellung zu einem Tier erstellen und diese dann f�r jede weitere Ausstellung kopieren und einf�gen. Dies w�re allerdings ein schwieriger und manueller Prozess, da alle Informationen und Eigenschaften f�r jede neue Ausstellung ge�ndert werden m�sste. Au�erdem gibt es vielleicht einmal tausende von Ausstellungen. Um diese Problemstellung weiter auszubauen, gehen wir davon aus, da� Sie zu jeder Ausstellung die Information haben m�chten, ob sich das Tier vom Aussterben bedroht ist oder nicht. Mit "kopieren und einf�gen" w�rden Sie jede Ausstellung einzeln �ndern m�ssen. "Kopieren und Einf�gen" w�rde sich also eindeutig nicht f�r einen gro�en Zoo anwenden lassen und dies w�rde ziemlich teuer werden. Sie m�ssen au�erdem sicherstellen, da� jede Ausstellung einfach zu handhaben ist. Die Betreuer der einzelnen Ausstellungen sollten diejenigen sein, die die Informationen zur Verf�gung stellen. Keiner der Betreuer hat aber eine gro�e Ahnung von Zope oder wie man Webseiten gestaltet. Sicherlich werden Sie nicht deren Zeit verschwenden wollen, um dies zu erlernen. Die Betreuer sollen nichts weiter zu tun brauchen als Informationen �ber Ihre Interessen in ein einfaches Formular einzutragen, "ver�ffentlichen" zu klicken und wieder weggehen zu k�nnen. Mit der Erzeugung eines Zope Produkts erreichen Sie dieses Ziel einfach und schnell. Sie k�nnen einfach handhabbare Objekte erzeugen, die Ihre Betreuer benutzen k�nnen. Sie k�nnen Seitenvorlagen f�r Ausstellungen definieren, deren einmalige �nderung alle Ausstellungsseiten ??? ver�ndert / betrifft. All diese Dinge k�nnen Sie durch die Erstellung von Produkten tun. Ein einfaches Produkt erzeugenDurch die Benutzung von Produkten k�nnen Sie das Problem der Erstellung und Verwaltung von Ausstellungen l�sen. Lassen Sie uns mit dem Beispiel, wie man ein einfaches Produkt erstellt. beginnen. Es soll uns erm�glichen, Informationen �ber die Ausstellungen zu sammeln und eine ma�geschneiderte Ausstellung zu erzeugen. Weiter hinten im Kapitel werden Sie komplexere und leistungsf�higere Wege zur Benutzung von Produkten kennenlernen. ??? Der gr��te Wert eines Zope Produktes liegt darin, da� es erlaubt Objekte an einem zentralen Platz zu erzeugen und man �ber die "Product Add" Liste Zugang zu den Objekten hat. Dies gibt Ihnen die M�glichkeit, globale Dienste zu erstellen und diese mittels eines Standard Teiles??? des Zope Management-Interfaces zug�nglich zu machen. This gives you the ability to build global services and make them available via a standard part of the Zope management interface. Mit anderen Worten: Produkte erlauben Ihnen, Zope Ihren W�nschen anzupassen. Beginnen Sie, indem Sie zum Products Ordner im Control Panelgehen. Klicken Sie auf den Add Product Knopf im Product Management Ordner, um ein neues Produkt zu erzeugen. Dies wird sie zum "Produkt hinzuf�gen" (Product add) Formular bringen. Geben Sie die id "ZooAusstellung" ein und klicken Sie Generate. Sie werden nun Ihr neues Produkt im Product Management Ordner sehen.Es sollte ein ge�ffnetes blaues P�ckchen zu sehen sein. Der ge�ffnete Deckel zeigt an, da� Sie das Produkt anklicken und durch das Web administrieren k�nnen. W�hlen Sie das ZooAusstellung Produkt aus. Dadurch werden Sie auf den Produkt Management Bildschirm gelangen. Bis auf einige wenige Unterschiede sieht der Management-Bildschirm f�r ein Produkt genauso aus wie ein Ordner und er verh�lt sich auch so:
Erzeugen Sie in der Contents Ansicht eine DTML Methode namens Hallo mit diesem Inhalt:
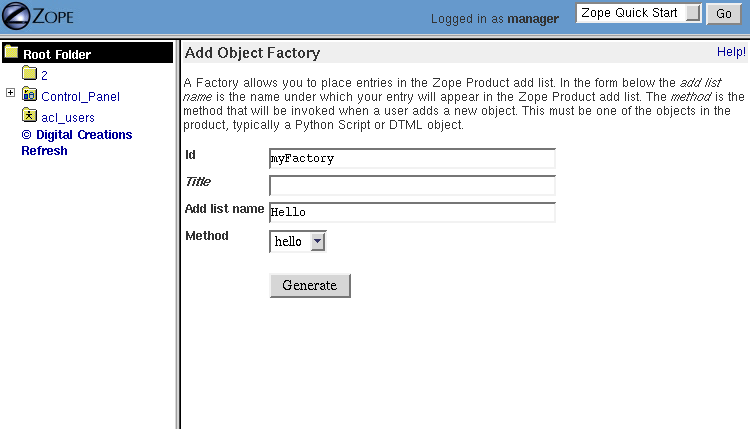
Diese Methode erlaubt Ihnen, Ihr Produkt zu testen. Als n�chstes erzeugen wir eine Fabrik (engl. Factory). W�hlen Sie aus der Produktauswahlliste Zope Factory aus. Sie gelangen dann zu einem Formular zur Erzeugung einer Fabrik, wie in Bild 12-2 gezeigt. Fabriken stellen eine Br�cke zwischen Ihrer Produktauswahlliste und Ihrem Produkt her. Geben Sie Ihrer Fabrik die ID meineFabrik. In das Add list name Feld geben Sie Hallo und in der Auswahl Method w�hlen Sie hallo. Klicken sie nun Generate, danach klicken Sie auf die neue Fabrik und �ndern die Permission auf Add Document, Images, and Files und best�tigen diese �nderungen mit Save Changes. Diese �nderung teilt Zope mit, da� Sie die Rechte zum Hinzuf�gen von Dokumenten, Bildern und Dateien haben m�ssen, um die Fabrik benutzen zu k�nnen. Herzlichen Gl�ckwunsch, Sie haben soeben das Zope-Management-Interface Ihren W�nschen angepasst. Gehen Sie zum Stammordner und klicken Sie die Produktauswahlliste an. Sie werden feststellen, da� diese nun einen Eintrag namens Hallo enth�lt. W�hlen Sie Hallo von der Produktauswahlliste aus und Ihre hallo Methode wird aufgerufen. Eine der �blichsten Anwendungen die man mit Fabriken verbindet, ist das Kopieren von Objekten in den aktuellen Ordner. Mit anderen Worten: Die Methoden k�nnen Zugang zum Ort von welchem sie aufgerufen werden erlangen und dort dann Arbeiten in diesem Ordner ausf�hren, inklusive Objekte in ihn zu kopieren ??? In other words your methods can get access to the location from which they were called and can then perform operations on that Folder including copy objects into it.??? Nur weil Sie alle m�glichen verr�ckten Sachen mit Fabriken und Produkten anstellen k�nnen, sollten Sie diese �brigens nicht tun. Im Allgemeinen geht ein Anwender davon aus, da� er, wenn er in der Produktauswahlliste ein Produkt ausgew�hlt hatte, zu einem Erstellformular gelangt, in dem er die ID und ein neues Objekt festlegt. Als n�chstes erwartet er, da� ein neues Objekt mit der zuvor festgelegten ID erstellt wird wenn er hinzuf�gen (Add) gew�hlt hatte. Schauen wir nun, wie wir diesen Erwartungen gerecht werden. Zuerst erstellen wir einen neuen Ordner mit dem Namen AusstellungsVorlage in Ihrem Produkt Ordner (ZooAusstellung). Dieser wird als Vorlage f�r Ihre Ausstellungen dienen. Nun erstellen wir ebenfalls im Produkt Ordner eine DTML Methode namens Erstellformular und ein Python Skript namens erstellen Diese Objekte werden neue Instanzen im Ausstellungsprojekt erzeugen. Gehen Sie jetzt zu Ihrer Fabrik zur�ck und �ndern Sie sie, so da� bei Add list name ZooAusstellung steht und die Methode Erstellformular ist. Wenn nun jemand Zooausstellung von der Produktauswahlliste w�hlt, wird die Methode Erstellformulardurchgef�hrt. Diese Methode soll Informationen �ber die ID und den Titel der Ausstellung sammeln. Wenn der Benutzer hinzuf�gen klickt, soll das Skript erstellen aufgerufen werden welches den Ordner AusstellungsVorlage in den aufrufenden Ordner kopiert und ihm die angegebene ID gibt. Der n�chste Schritt ist, das Erstellformular mit diesem Inhalt zu editieren:
Zugegebenerma�en ist dies ein eher kahles Erstellformular. Es sammelt kaum Daten und es sagt dem Benutzer nicht, was eine Zoo Ausstellung ist und wieso er welche hinzf�gen sollte. Wenn Sie Ihre eigenen Webanwendung gestalten, werden Sie mehr tun wollen als in diesem Beispiel. Beachten Sie bitte, da� diese Methode keine Standard HTML Kopf- und Fu�zeilen enth�lt. Es ist eine Zope-Konvention da� Zope Management-Bildschirme nicht dieselben Kopf- und Fu�zeilen wie Ihre herk�mmlichen Seite benutzen. Stattdessen benutzen Management-Bildschirme Au�erdem stellen Sie fest, dass die Action f�r das Formular das erstellen Skript ist. F�gen Sie nun den folgenden Inhalt in das erstellen Skript ein: ## Script (Python) "add"
##parameters=id ,title, REQUEST=None
##
"""
Kopieren Sie die AusstellungsVorlage in den aufrufenden Ordner
"""
# Duplizieren Sie die Vorlage und geben Sie ihm die neue ID Dies wird in den
# aktuellen Kontext plaziert (der Platz von dem die Fabrik aus aufgerufen wurde).
exhibit=context.manage_clone(container.exhibitTemplate,id)
# �ndern des Titel des Duplikates
exhibit.manage_changeProperties(title=title)
# Wenn durch das Web aufgerufen wurde, zur�ck zum Kontext umleiten. ???If we were called through the web, redirect back to the context
if REQUEST is not None:
try: u=context.DestinationURL()
except: u=REQUEST['URL1']
REQUEST.RESPONSE.redirect(u+'/manage_main?update_menu=1')
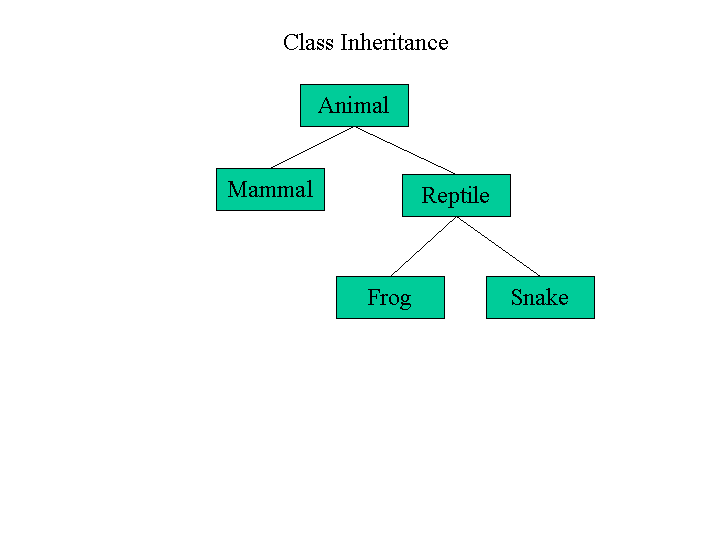
Dieses Skript vervielf�ltigt die AusstellungsVorlage und kopiert sie mit der angegebenen ID zum aktuellen Ordner. Dann �ndert es die Eigenschaften des Titels der neuen Ausstellung. Am Ende gibt es den Management Bildschirm des aktuellen Ordners zur�ck indem es manage_main aufruft. ??? Finally it returns the current folder's main management screen by calling manage_main. Herzlichen Gl�ckwunsch, Sie haben soeben Zope durch die Erstellung eines neuen Produktes erweitert. Sie haben einen Weg geschaffen, Objekte mithilfe der Produktauswahlliste in Zope zu kopieren. Trotzdem leidet diese L�sung noch unter einem Problem, das wir schon fr�her in diesem Kapitel anbgeschnitten hatten. Obwohl Sie die AusstellungsVorlage an einem zentralen Ort editieren k�nnen, ist es trotzdem noch immer nur eine Vorlage. Wenn Sie also eine neue Eigenschaft zur Vorlage hinzuf�gen, wird das keine der bereits existierenden Ausstellungen beeinflussen. Um existierende Ausstellungen zu �ndern, m�ssen Sie diese von Hand �ndern. ZKlassen (ZClasses) bringen Sie einen Schritt weiter, indem sie Ihnen eine zentrale Vorlage erm�glichen, die einen neuen Typen von Objekt definieren. Wenn Sie diese Vorlage dann �ndern, �ndern sich gleichzeitig auch automatisch alle Objekte dieses Types. Diese zentrale Vorlage nennt man ZKlasse (ZClass). Im n�chsten Abschnitt werden Sie lernen, wie eine ZKlasse erstellt wird, die eine neue ZKlasse namens Ausstellung definiert. ZKlassen (ZClasses) erzeugenZKlassen sind Werkzeuge die Ihnen helfen, neue Typen von Objekten zu bilden, indem sie eine Klasse definieren. Eine Klasse ist wie ein Entwurfsplan f�r Objekte. Wenn Sie eine Klasse definieren, legen Sie fest, wie ein Objekt bei seiner Erstellung sein wird. EIne Klasse kann Methoden, Eigenschaften und andere Attribute definieren. Objekte, die Sie �ber eine bestimmte Klasse erstellen, werden Instanzen dieser Klasse genannt. So gibt es beispielsweise nur eine Klasse namens Ordner, Sie k�nnen aber mehrere Ordner-Instanzen in Ihrer Anwendung haben. Instanzen besitzen dieselben Methoden und Eigenschaften wie ihre Klasse. Wenn Sie die Klasse �ndern, werden alle Instanzen diese �nderung ausgeben/reflektieren??? Anders als die Vorlagen, die wir im letzten Abschnitt erstellt haben, �bernehmen Klassen fortlaufend die Kontrolle �ber Instanzen. Beachten Sie aber bitte, da� diese Kontrolle nur in eine Richtung funktioniert: Wenn Sie �nderung in einer Instanz machen, beeinflussen diese nicht die Klasse oder andere Instanzen. ZKlassen entsprechen den Formatvorlagen in Textverarbeitungsprogrammen. Die meisten Textverarbeitungen liefern ein Set an vordefinierten Vorlagen, die man zum Erstellen einer bestimmten Art von Dokument benutzen kann, so zum Beispiel zur Erstellung eines Lebenslaufes. Es mag vielleicht Hunderttausende von Lebensl�ufen geben, die auf der Lebenslauf-Vorlage von Microsoft basieren, aber es gibt daf�r nur eine Vorlage. Ein Zope-Objekt verh�lt sich zu einer ZKlasse wie ein einzelner Lebenslauf zu einer Formatvorlage f�r Lebensl�ufe. ZKlasse k�nnen Sie durch Benutzung der Zope Management-Oberfl�che �ber das Web erstellen. Klassen k�nnen auch in Python geschrieben werden, aber dies wird in diesem Buch nicht behandelt. ZKlassen k�nnen Attribute von anderen Klassen erben. Diese Vererbung erlaubt es Ihnen, eine neue Klasse zu definieren, die auf einer anderen Klasse basiert. Gehen wir beispielsweise davon aus, Sie m�chten eine neue Art von Dokument mit speziellen f�r Sie interessanten Eigenschaften erstellen. Statt alle Funktionalit�t dieses Dokumentes von Grund auf neu zu erstellen, k�nnen Sie diese einfach von der DTML Dokument-Klasse erben und nur die neuen Informationen an denen Sie interessiert sind, hinzuf�gen. Mithilfe von Vererbung k�nnen Sie auch verallgemeinernde Beziehungen zwischen Klassen erstellen. Zum Beispiel k�nnten Sie eine Klasse namens Figure 12-3 Beispiel f�r Vererbung in Klassen ZKlassen k�nnen von den meisten Klassen, die wir in diesem Buch verwenden, erben. Zus�tzlich k�nnen ZKlassen von anderen ZKlassen im selben Produkt erben. Wir werden diese und andere Techniken in diesem Kapitel anwenden. Bevor wir mit dem n�chsten Beispiel weitermachen, sollten Sie das existierende Produkt ZooAusstellung in Ihrem Zope Produkt Ordner umbenennen, zum Beispiel zu ZooVorlage, damit dieses nicht mit diesem Beispiel in Konflikt ger�t. Erstellen Sie nun ein neues Produkt im Produkt Ordner namens ZooAusstellung. W�hlen Sie nun ZClass aus der Auswahlliste in der Inhaltsansicht der ZooAusstellung aus. Dieses Formular ist komplex und hat jede Menge Elemente. Wir werden diese Schritt f�r Schritt durchgehen:
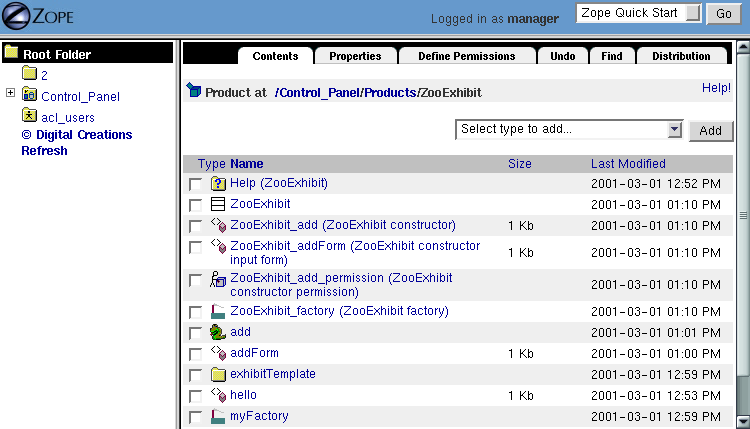
Klicken Sie nun Add. Danach kommen Sie automatisch zur �bersicht des Produktes ZooAusstellung. Sie werden nun f�nf neue Objekte vorfinden, wie in Abbildung 12-4 gezeigt. Figure 12-4 Produkt mit einer ZKlasse Die f�nf Objekte die Zope erstellt hat sind alle so konfiguriert, da� sie problemlos funktionieren, Sie brauchen diese momentan also nicht �ndern. Hier eine kurz Beschreibung von jedem neu erstellten Objekt:
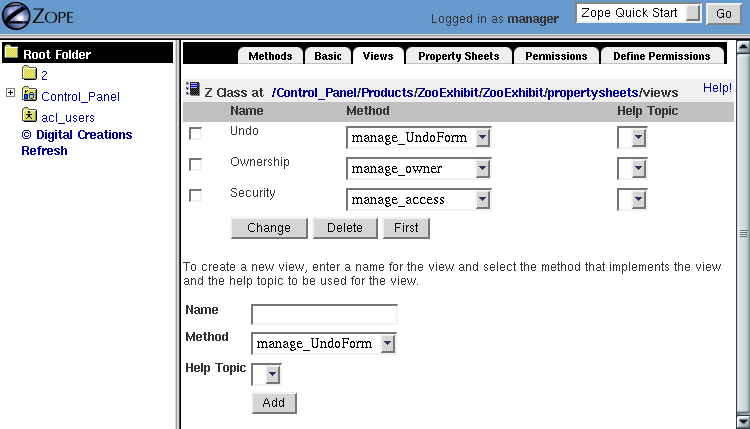
That's it, you've created your first ZClass. Click on the new ZClass and click on its Basic tab. The Basic view on your ZClass lets you change some of the information you specified on the ZClass add form. You cannot change the base classes of a ZClass. As you learned earlier in the chapter, these settings include:
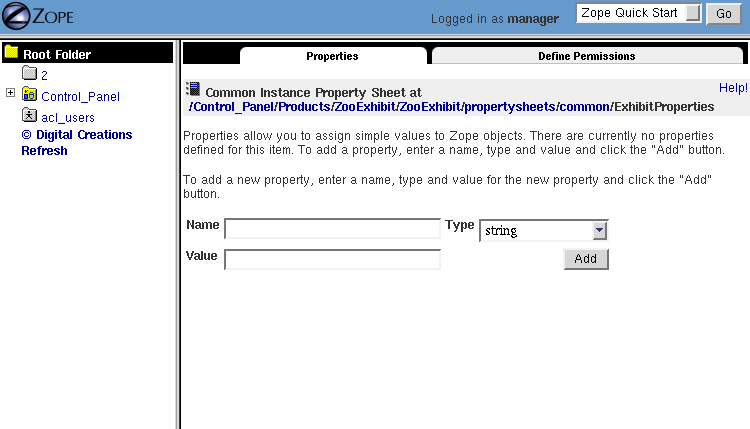
At this point, you can start creating new instances of the ZooExhibit ZClass. First though, you probably want a common place where all exhibits are defined, so go to your root folder and select Folder from the add list and create a new folder with the id "Exhibits". Now, click on the Exhibits folder you just created and pull down the Add list. As you can see, ZooExhibit is now in the add list. Go ahead and select ZooExhibit from the add list and create a new Exhibit with the id "FangedRabbits". After creating the new exhibit, select it by clicking on it. As you can see your object already has three views, Undo, Ownership, and Security. You don't have to define these parts of your object, Zope does that for you. In the next section, we'll add some more views for you to edit your object. Creating Views of Your ZClassAll Zope objects are divided into logical screens called Views. Views are used commonly when you work with Zope objects in the management interface, the tabbed screens on all Zope objects are views. Some views like Undo, are standard and come with Zope. Views are defined on the Views view of a ZClass. Go to your ZooExhibit ZClass and click on the Views tab. The Views view looks like Figure 12-5. Figure 12-5 The Views view. On this view you can see the three views that come automatically with your new object, Undo, Ownership, and Security. They are automatically configured for you as a convenience, since almost all objects have these interfaces, but you can change them or remove them from here if you really want to (you generally won't). The table of views is broken into three columns, Name, Method, and Help Topic. The Name is the name of the view and is the label that gets drawn on the view's tab in the management interface. The Method is the method of the class or property sheet that gets called to render the view. The Help Topic is where you associate a Help Topic object with this view. Help Topics are explained more later. Views also work with the security system to make sure users only see views on an object that they have permission to see. Security will be explained in detail a little further on, but it is good to know at this point that views now only divide an object management interfaces into logical chunks, but they also control who can see which view. The Method column on the Methods view has select boxes that let you choose which method generates which view. The method associated with a view can be either an object in the Methods view, or a Property Sheet in the Property Sheets view. Creating Properties on Your ZClassProperties are collections of variables that your object uses to store information. A Zoo Exhibit object, for example, would need properties to contain information about the exhibit, like what animal is in the exhibit, a description, and who the caretakers are. Properties for ZClasses work a little differently than properties on Zope objects. In ZClasses, Properties come in named groups called Property Sheets. A Property Sheet is a way of organizing a related set of properties together. Go to your ZooExhibit ZClass and click on the Property Sheets tab. To create a new sheet, click Add Common Instance Property Sheet. This will take you to the Property Sheet add form. Call your new Property Sheet "ExhibitProperties" and click Add. Now you can see that your new sheet, ExhibitProperties, has been created in the Property Sheets view of your ZClass. Click on the new sheet to manage it, as shown in Figure 12-6. Figure 12-6 A Property Sheet As you can see, this sheet looks very much like the Properties view on Zope objects. Here, you can create new properties on this sheet. Properties on Property Sheets are exactly like Properties on Zope objects, they have a name, a type, and a value. Create three new properties on this sheet:
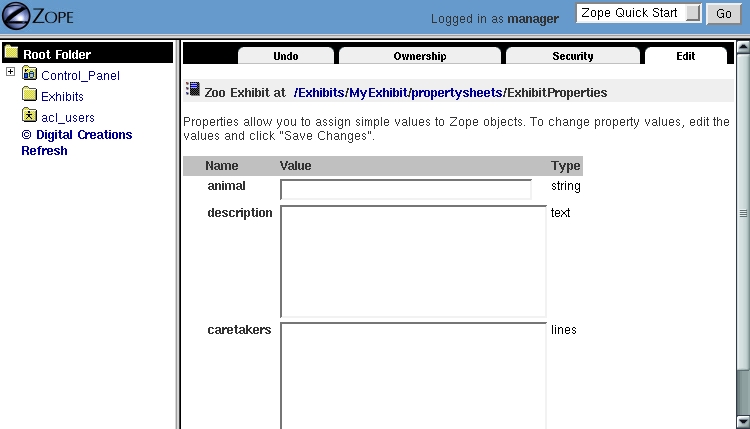
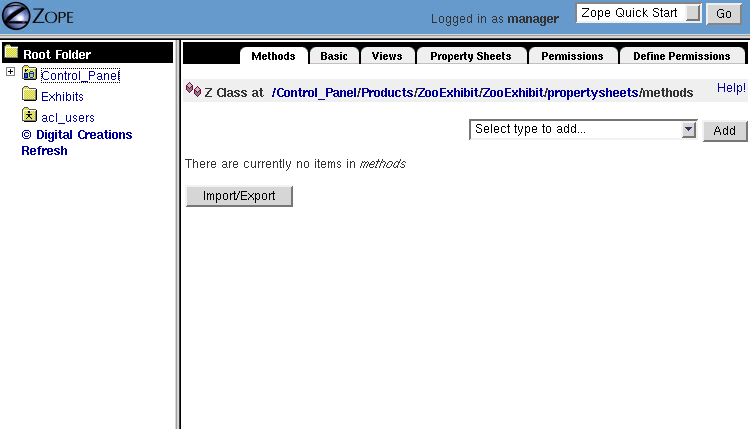
Property Sheets have two uses. As you've seen with this example, they are a tool for organizing related sets of properties about your objects, second to that, they are used to generate HTML forms and actions to edit those set of properties. The HTML edit forms are generated automatically for you, you only need to associate a view with a Property Sheet to see the sheet's edit form. For example, return to the ZooExhibit ZClass and click on the Views tab and create a new view with the name Edit and associate it with the method propertysheets/ExhibitProperties/manage_edit. Since you can use Property Sheets to create editing screens you might want to create more than one Property Sheet for your class. By using more than one sheet you can control which properties are displayed together for editing purposes. You can also separate private from public properties on different sheets by associating them with different permissions. Now, go back to your Exhibits folder and either look at an existing ZooExhibit instance or create a new one. As you can see, a new view called Edit has been added to your object, as shown in Figure Figure 12-7. Figure 12-7 A ZooExhibit Edit view This edit form has been generated for you automatically. You only needed to create the Property Sheet, and then associate that sheet with a View. If you add another property to the ExhibitProperties Property Sheet, all of your instances will automatically get a new updated edit form, because when you change a ZClass, all of the instances of that class inherit the change. It is important to understand that changes made to the class are reflected by all of the instances, but changes to an instance are not reflected in the class or in any other instance. For example, on the Edit view for your ZooExhibit instance (not the class), enter "Fanged Rabbit" for the animal property, the description "Fanged, carnivorous rabbits plagued early medieval knights. They are known for their sharp, pointy teeth." and two caretakers, "Tim" and "Somebody Else". Now click Save Changes. As you can see, your changes have obviously effected this instance, but what happened to the class? Go back to the ZooExhibit ZClass and look at the ExhibitProperties Property Sheet. Nothing has changed! Changes to instances have no effect on the class. You can also provide default values for properties on a Property Sheet. You could, for example, enter the text "Describe your exhibit in this box" in the description property of the ZooExhibit ZClass. Now, go back to your Exhibits folder and create a new , ZooExhibit object and click on its Edit view. Here, you see that the value provided in the Property Sheet is the default value for the instance. Remember, if you change this instance, the default value of the property in the Property Sheet is not changed. Default values let you set up useful information in the ZClass for properties that can later be changed on an instance-by-instance basis. You may want to go back to your ZClass and click on the Views tab and change the "Edit" view to be the first view by clicking the First button. Now, when you click on your instances, they will show the Edit view first. Creating Methods on your ZClassThe Methods View of your ZClass lets you define the methods for the instances of your ZClass. Go to your ZooExhibit ZClass and click on the Methods tab. The Methods view looks like Figure 12-8. Figure 12-8 The Methods View You can create any kind of Zope object on the Methods view, but generally only callable objects (DTML Methods and Scripts, for example) are added. Methods are used for several purposes:
A good example of a presentation method is a DTML Method that displays a Zoo Exhibit to your web site viewers. This is often called the public interface to an object and is usually associated with the View view found on most Zope objects. Create a new DTML Method on the Methods tab of your ZooExhibit ZClass called index_html. Like all objects named index_html, this will be the default representation for the object it is defined in, namely, instances of your ZClass. Put the following DTML in the index_html Method you just created:
Now, you can visit one of your ZooExhibit instances directly through the web, for example, http://www.zopezoo.org/Exhibits/FangedRabbits/ will show you the public interface for the Fanged Rabbit exhibit. You can use Python-based or Perl-based Scripts, and even Z SQL Methods to implement logic. Your logic objects can call each other, and can be called from your presentation methods. To create the isHungry method, first create two new properties in the ExhibitProperties property sheet named "last_meal_time" that is of the type date and "isDangerous" that is of the type boolean. This adds two new fields to your Edit view where you can enter the last time the animal was fed and select whether or not the animal is dangerous. Here is an example of an implementation of the isHungry method in Python: ## Script (Python) "isHungry"
##
"""
Returns true if the animal hasn't eaten in over 8 hours
"""
from DateTime import DateTime
if (DateTime().timeTime()
- container.last_meal_time.timeTime() > 60 * 60 * 8):
return 1
else:
return 0
The You could call this method from your index_html display method using this snippet of DTML:
You can even call a number of logic methods from your display methods. For example, you could improve the hunger display like so:
Your display method now calls logic methods to decide what actions are appropriate and creates links to those actions. For more information on Properties, see Chapter 3, "Using Basic Zope Objects". ObjectManager ZClassesIf you choose ZClasses:ObjectManager as a base class for your ZClass then instances of your class will be able to contain other Zope objects, just like Folders. Container classes are identical to other ZClasses with the exception that they have an addition view Subobjects. From this view you can control what kinds of objects your instances can contain. For example if you created a FAQ container class, you might restrict it to holding Question and Answer objects. Select one or more meta-types from the select list and click the Change button. The Objects should appear in folder lists check box control whether or not instances of your container class are shown in the Navigator pane as expandable objects. Container ZClasses can be very powerful. A very common pattern for web applications is to have two classes that work together. One class implements the basic behavior and hold data. The other class contains instances of the basic class and provides methods to organize and list the contained instances. You can model many problems this way, for example a ticket manager can contain problem tickets, or a document repository can contain documents, or an object router can contain routing rules, and so on. Typically the container class will provide methods to add, delete, and query or locate contained objects. ZClass Security ControlsWhen building new types of objects, security can play an important role. For example, the following three Roles are needed in your Zoo:
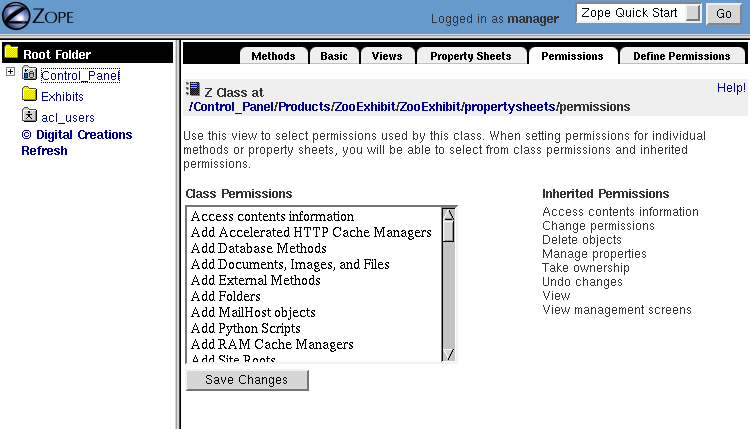
As you learned in Chapter 7, "Users and Security", creating new roles is easy, but how can you control who can create and edit new ZooExhibit instances? To do this, you must define some security policies on the ZooExhibit ZClass that control access to the ZClass and its methods and property sheets. Controlling access to Methods and Property SheetsBy default, Zope tries to be sensible about ZClasses and security. You may, however, want to control access to instances of your ZClass in special ways. For example, Zoo Caretakers are really only interested in seeing the Edit view (and perhaps the Undo view, which we'll show later), but definitely not the Security or Ownership views. You don't want Zoo caretakers changing the security settings on your Exhibits; you don't even want them to see those aspects of an Exhibit, you just want to give them the ability to edit an exhibit and nothing else. To do this, you need to create a new Zope Permission object in the ZooExhibit Product (not the ZClass, permissions are defined in Products only). To do this, go to the ZooExhibit Product and select Zope Permission from the add list. Give the new permission the Id "edit_exhibit_permission" and the Name "Edit Zoo Exhibits" and click Generate. Now, select your ZooExhibit ZClass, and click on the Permissions tab. This will take you to the Permissions view as shown in Figure Figure 12-9. Figure 12-9 The Permissions view This view shows you what permissions your ZClass uses and lets you choose additional permissions to use. On the right is a list of all of the default Zope permissions your ZClass inherits automatically. On the left is a multiple select box where you can add new permissions to your class. Select the Edit Zoo Exhibits permission in this box and click Save Changes. This tells your ZClass that it is interested in this permission as well as the permissions on the right. Now, click on the Property Sheets tab and select the ExhibitProperties Property Sheet. Click on the Define Permissions tab. You want to tell this Property Sheet that only users who have the Edit Zoo Exhibits permission you just created can manage the properties on the ExhibitProperties sheet. On this view, pull down the select box and choose Edit Zoo Exhibits. This will map the Edit Zoo Exhibits to the Manage Properties permission on the sheet. This list of permissions you can select from comes from the ZClass Permissions view you were just on, and because you selected the Edit Zoo Exhibits permission on that screen, it shows up on this list for you to select. Notice that all options default to disabled which means that the property sheet cannot be edited by anyone. Now, you can go back to your Exhibits folder and select the Security view. Here, you can see your new Permission is on the left in the list of available permission. What you want to do now is create a new Role called Caretaker and map that new Role to the Edit Zoo Exhibits permission. Now, users must have the Caretaker role in order to see or use the Edit view on any of your ZooExhibit instances. Access to objects on your ZClass's Methods view are controlled in the same way. Controlling Access to instances of Your ZClassThe previous section explained how you can control access to instances of your ZClass's Methods and Properties. Access control is controlling who can create new instances of your ZClass. As you saw earlier in the chapter, instances are created by Factories. Factories are associated with permissions. In the case of the Zoo Exhibit, the Add Zoo Exhibits permission controls the ability to create Zoo Exhibit instances. Normally only Managers will have the Add Zoo Exhibits permission, so only Managers will be able to create new Zoo Exhibits. However, like all Zope permissions, you can change which roles have this permissions in different locations of your site. It's important to realize that this permission is controlled separately from the Edit Zoo Exhibits permission. This makes it possible to allow some people such as Caretakers to change, but not create Zoo Exhibits. Providing Context-Sensitive Help for your ZClassOn the View screen of your ZClass, you can see that each view can be associated with a Help Topic. This allows you to provide a link to a different help topics depending on which view the user is looking at. For example, let's create a Help Topic for the Edit view of the ZooExhibit ZClass. First, you need to create an actual help topic object. This is done by going to the ZooExhibit Product which contains the ZooExhibit ZClass, and clicking on the Help folder. The icon should look like a folder with a blue question mark on it. Inside this special folder, pull down the add list and select Help Topic. Give this topic the id "ExhibitEditHelp" and the title "Help for Editing Exhibits" and click Add. Now you will see the Help folder contains a new help topic object called ExhibitEditHelp. You can click on this object and edit it, it works just like a DTML Document. In this document, you should place the help information you want to show to your users:
Now that you have created the help topic, you need to associate with the Edit view of your ZClass. To do this, select the ZooExhibit ZClass and click on the Views tab. At the right, in the same row as the Edit view is defined, pull down the help select box and select ExhibitEditHelp and click Change. Now go to one of your ZooExhibit instances, the Edit view now has a *Help!* link that you can click to look at your Help Topic for this view. In the next section, you'll see how ZClasses can be cobined with standard Python classes to extend their functionality into raw Python. Using Python Base ClassesZClasses give you a web managable interface to design new kinds of objects in Zope. In the beginning of this chapter, we showed you how you can select from a list of base classes to subclass your ZClass from. Most of these base classes are actually written in Python, and in this section you'll see how you can take your own Python classes and include them in that list so that your ZClasses can extend their methods. Writing Python base classes is easy, but it involves a few installation details. To create a Python base class you need access to the filesystem. Create a directory inside your lib/python/Products directory named AnimalBase. In this directory create a file named Animal.py with these contents: class Animal:
"""
A base class for Animals
"""
_hungry=0
def eat(self, food, servings=1):
"""
Eat food
"""
self._hungry=0
def sleep(self):
"""
Sleep
"""
self._hungry=1
def hungry(self):
"""
Is the Animal hungry?
"""
return self._hungry
This class defines a couple related methods and one default attribute. Notice that like External Methods, the methods of this class can access private attributes. Next you need to register your base class with Zope. Create an __init__.py file in the AnimalBase directory with these contents: from Animal import Animal
def initialize(context):
"""
Register base class
"""
context.registerBaseClass(Animal)
Now you need to restart Zope in order for it find out about your base class. After Zope restarts you can verify that your base class has been registered in a couple different ways. First go to the Products Folder in the Control Panel and look for an AnimalBase package. You should see a closed box product. If you see broken box, it means that there is something wrong with your AnimalBase product. Click on the Traceback view to see a Python traceback showing you what problem Zope ran into trying to register your base class. Once you resolve any problems that your base class might have you'll need to restart Zope again. Continue this process until Zope successfully loads your product. Now you can create a new ZClass and you should see AnimalBase:Animal as a choice in the base classes selection field. To test your new base class create a ZClass that inherits from AnimalBase:Animal. Embellish you animal however you wish. Create a DTML Method named care with these contents:
Now create an instance of your animal class and test out its care method. The care method lets you feed your animal and give it sleep by calling methods defined in its Python base class. Also notice how after feeding your animal is not hungry, but if you give it a nap it wakes up hungry. As you can see, creating your own Products and ZClasses is an involved process, but simple to understand once you grasp the basics. With ZClasses alone, you can create some pretty complex web applications right in your web browser. In the next section, you'll see how to create a distribution of your Product, so that you can share it with others or deliver it to a customer. Distributing ProductsNow you have created your own Product that lets you create any number of exhibits in Zope. Suppose you have a buddy at another Zoo who is impressed by your new online exhibit system, and wants to get a similar system for his Zoo. Perhaps you even belong to the Zoo keeper's Association of America and you want to be able to give your product to anyone interested in an exhibit system similar to yours. Zope lets you distribute your Products as one, easy to transport package that other users can download from you and install in their Zope system. To distribute your Product, click on the ZooExhibit Product and select the Distribution tab. This will take you to the Distribution view. The form on this view lets you control the distribution you want to create. The Version box lets you specify the version for your Product distribution. For every distribution you make, Zope will increment this number for you, but you may want to specify it yourself. Just leave it at the default of "1.0" unless you want to change it. The next two radio buttons let you select whether or not you want others to be able to customize or redistribute your Product. If you want them to be able to customize or redistribute your Product with no restrictions, select the Allow Redistribution button. If you want to disallow their ability to redistribute your Product, select the Disallow redistribution and allow the user to configure only the selected objects: button. If you disallow redistribution, you can choose on an object by object basis what your users can customize in your Product. If you don't want them to be able to change anything, then don't select any of the items in this list. If you want them to be able to change the ZooExhibit ZClass, then select only that ZClass. If you want them to be able to change everything (but still not be able to redistribute your Product) then select all the objects in this list. Now, you can create a distribution of your Product by clicking Create a distribution archive. Zope will now automatically generate a file called ZooExhibit-1.0.tar.gz. This Product can be installed in any Zope just like any other Product, by unpacking it into the root directory of your Zope installation. Don't forget that when you distribute your Product you'll also need to include any files such as External Method files and Python base classes that your class relies on. This requirement makes distribution more difficult and for this reason folks sometimes try to avoid relying on Python files when creating through the web Products for distribution. Macht es Sinn die Namen der Klassen und Methoden zu �bersetzen?? (ZooExhibit --> ZooAusstellung), wenn diese auf den Screenshots noch auf englisch stehen? Ich finde das ist ein wenig kontraproduktiv, da damit dem Leser evtl. die Zusammenh�nge nicht klar werden |
|